Registration and login module extension development |
iPortal allows developers to integrate custom pages via iFrame method to completely rewrite the elements and styles of registration and login pages, implementing highly free customization.
The general extension development of registration and login workflow includes: Calling iPortal back-end REST API, Page content implementation, Configure to enable custom pages. To guide you easily conduct the extension development, iPortal package provides a set of demonstration code which locates in %SuperMap iPortal_HOME%\webapps\iportal\resources\web-ui\extend\login directory.
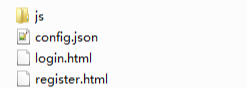
The sample code structure is:
The login.html and register.html are the custom HTML pages; config.json is the extension development configuration file (This file is a must file and the name can't be modified); inside the js folder are the developed JavaScript files used to talking with the APIs of the back-end registration and login module of iPortal.
Note:
1.The rootUrl in the sample code below refers to http://{ip}/{port}/{contextPath}/ (for example: http://127.0.0.1:8190/iportal/), the definition method can refer to:
var index = window.location.href.indexOf('resources');
var rootUrl = window.location.href.slice(0,index).replace(window.location.origin,'');
2.Since the custom page is integrated via iFrame method, the window.parent object of the custom page should be the window object of the web-ui pages. If you need to switch between the login, registration pages, you can realize by calling the window.parent.changeRoute(param) method, of which the param value can be "login"/"register".
iPortal provides the full-featured REST API for clients. You can call the registration and login related REST API to implement custom pages to interact with the iPortal back-end. The following section introduces the related REST API of the login, registration modules, and the specific usages.
Step 1 (Optional): If your system needs to support the OAuth 2.0 based third-party account login (supports QQ /Sina/WeChat account login), you need to send the request for systemConfig to get the configured third-party login methods. The oauthConfig field in the response returned by systemConfig request is the third-party login information. The table below lists the related fields used for extending the login page.
| Field | Description |
loginType |
The third-party login type. |
id |
ID of the third-party login configuration. |
redirectDomain |
Callback domain name for third-party login. |
On the login page. you need to specify the link for the specific third-pary login type as http://{redirectDomain}/iportal/services/security/login/{loginType}?configID={id}.
If your system doesn't need the third-party login function, just skip this step.
Step 2: Calling the login (http://{ip}:{port}/iportal/web/login.json) interface. By sending a POST request and carrying the corresponding username and password inside the request entity, you can log in to iPortal successfully. For the specific request parameters of the login interface, see: login.
The sample code (the index.js file in the SuperMap iPortal_HOME%\webapps\iportal\resources\web-ui\login\js directory) employs jQuery ajax to send requests, the following contents are the login related code in the index.js file.
function login(name, pass) {
var url = rootUrl + 'web/login.json';
var param = {
username: $(".login_name").val(),
password: $(".login_password").val(),
rememberme: $(".login_remember").is(':checked')
};
if (name && pass) {
param.username = name;
param.password = pass;
}
$.ajax({
type : "POST",
url : url,
data : JSON.stringify(param),
dataType: 'json',
success: function(result) {
console.log(result);
if ( result.succeed ) {
window.parent.open(rootUrl + "web-ui/home", "_self");
} else {
alert("Login failed");
}
},
error: function () {
alert("Login failed");
}
});
}
The code above defines the login method to get the input account and password and send a login request to iPortal, and which will return failure information or forward it to the homepage if login succeeded.
Step 1 (Optional): If your registration function needs to have some restrictions, for example, the users need to fill in their departments, email information, first you need to get and check the registration related configurations from the response of the portalConfig(http:// {ip}:{port}/iportal/web/config/portal.json)interface. For details, see: portalConfig.
If the department field is required by your registration function, you also need to get all the departments by sending a request to the departments (http://{ip}:{port}/iportal/manager/iportalconfig/departments.json) interface for the user to choose from,
If your system has no restriction like above, you can skip this step.
Step 2: Calling the registration related interfaces, including:
The following contents are the registration related code in the index.js file.
function sign_up() {
var param = {
name: $(".register_name").val(),
nickname: $(".register_nickname").val(),
password: $(".register_pass").val(),
passwordQuestion: {
pwdQuestion: $(".register_question").val(),
pwdAnswer: $(".register_answer").val()
}
};
var confirmPwd = $(".register_confirm_pass").val();
if (!param.nickname || !param.name || !param.password || !param.passwordQuestion.pwdAnswer) {
alert("Please fill out the form");
return;
}
if (confirmPwd !== param.password) {
alert("Passwords are not matched!");
return;
}
var registerUrl = rootUrl + 'web/users.json';
var checkNameUrl = rootUrl + 'web/users/registered.json?username=' + param.name;
var checkNicknameUrl = rootUrl + 'web/users/nickname/isregistered.json?nickname=' + param.nickname;
$.ajax({
type: "GET",
url: checkNameUrl,
dataType: 'json',
success: function(result) {
if (!result) {
$.ajax({
type: "GET",
url: checkNicknameUrl,
dataType: 'json',
success: function(result) {
if (!result) {
$.ajax({
type: "POST",
url: registerUrl,
data: JSON.stringify(param),
dataType: 'json',
success: function(result) {
if ( result.succeed ) {
login(param.name, param.password);
} else {
alert("Registration failed!");
}
}
});
} else {
alert("The nickname already exists!");
}
}
});
} else {
alert("The user already exists!");
}
}
});
}
The code above defines the sign_up method to record the entered information of the registration interface and verify the legitimacy. After the verification is passed, it sends a user registration request to iPortal, and returns the success or failure information.
In the sample code, the login.html, register.html are custom-developed pages, which employ the HTML+JavaScript+CSS technology stack to implement. Here we take the login page as an example to introduce some things to pay attention to when developing the page.
<!DOCTYPE html>
<html >
<head>
<meta charset="UTF-8">
<title>Login Example</title>
</head>
<body bgcolor="#ffffff">
<div class="login">
<h2>LOGIN</h2>
<input type="name" placeholder="Name" class="login_name"/>
<input type="password" placeholder="Password" class="login_password"/>
<span class="reset">
<input type="checkbox" class="login_remember"/>Remember Me
<a href="javascript:void(0)" class="openResetPwd" onclick="openResetPwdPage()">Forgot Password?</a>
</span><br/>
<button class="btn_login" onClick="login()">LOGIN</button>
</div>
<script src="js/jquery-3.4.1.min.js"></script>
<script src="js/index.js"></script>
<style>
.login {
margin: 100px auto;
width: 280px;
height: 400px;
}
h2{
text-align: center;
}
.login > input{
width: 280px;
height: 30px;
margin-bottom: 20px;
}
.reset{
display: inline-block;
width: 280px;
margin-bottom: 20px;
font-size: 14px;
text-align: left
}
.reset > a{
display: inline-block;
float: right;
color: #000;
cursor: pointer;
}
.btn_login {
width: 285px;
height: 35px;
}
</style>
</body>
</html>
In the above code, the class and method names, such as login_name, login_password, login_remember, openResetPwdPage(), login(), shoud be consistent with the names defined in the index.js file. <script src="js/jquery-3.4.1.min.js"></script> and <script src="js/index.js"></script> are used to import the JavaScript files used in the file.
The effect is as follows:
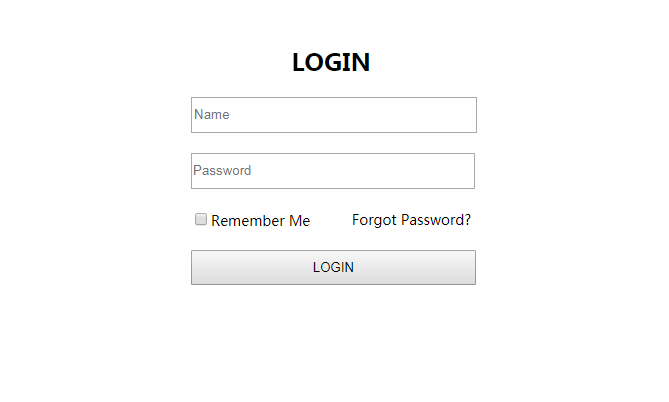
As a getting started tutorial, the page elements and styles are simple. Since iPortal integrates the extended pages via iFrame, you can use a richer front-end technology stack and visualization library to customize your exclusive page.
After complete the customized development of the registration/login pages, you need to modify the config.json file in the %SuperMap iPortal_HOME%\webapps\iportal\resources\web-ui\extend\login directory to apply the customized pages in iPortal. The contents of config.js are as follows:
{
"enable": true,
"extendType": "IFRAME",
"loginUrl": "{portalRoot}/resources/web-ui/extend/login/login.html",
"registerUrl": "{portalRoot}/resources/web-ui/extend/login/register.html"
}
Modify and save the configuration, the iPortal will use the configured customized pages.