Integrating an existing account system by using CAS |
If you already have your own user account system and want to connect it directly to iPortal without making new accounts, then iPortal provides you with a CAS-based approach to integrate existing user account system.
This section uses MySQL as the database for the sample user account system to introduce the configuration process:
In the database of your application account system, add a new field "usertype" (other name can also be used) and set a value for this field of each account record. You can use the SQL statement to set the usertype in batches which is more convenient and fast. The value can be cas_ADMIN, cas_USER, cas_PUBLISHER or a custom value. By default, cas_ADMIN is mapped to the administrative role in iPortal, iServer or iEdge; cas_USER corresponds to the common user role and cas_PUBLISHER corresponds to the publisher role in iServer or iEdge. To use the accounts in iPortal, it's recommended to use a custom value and you need to configure the mapping relationships in iPortal to bind to built-in roles defined by iPortal.
For the installation and configuration of CAS, please refer to: CAS installation and configuration. Note: since you already have your own database, skip the steps of creating database, and use your database connection information when configuring the related steps.
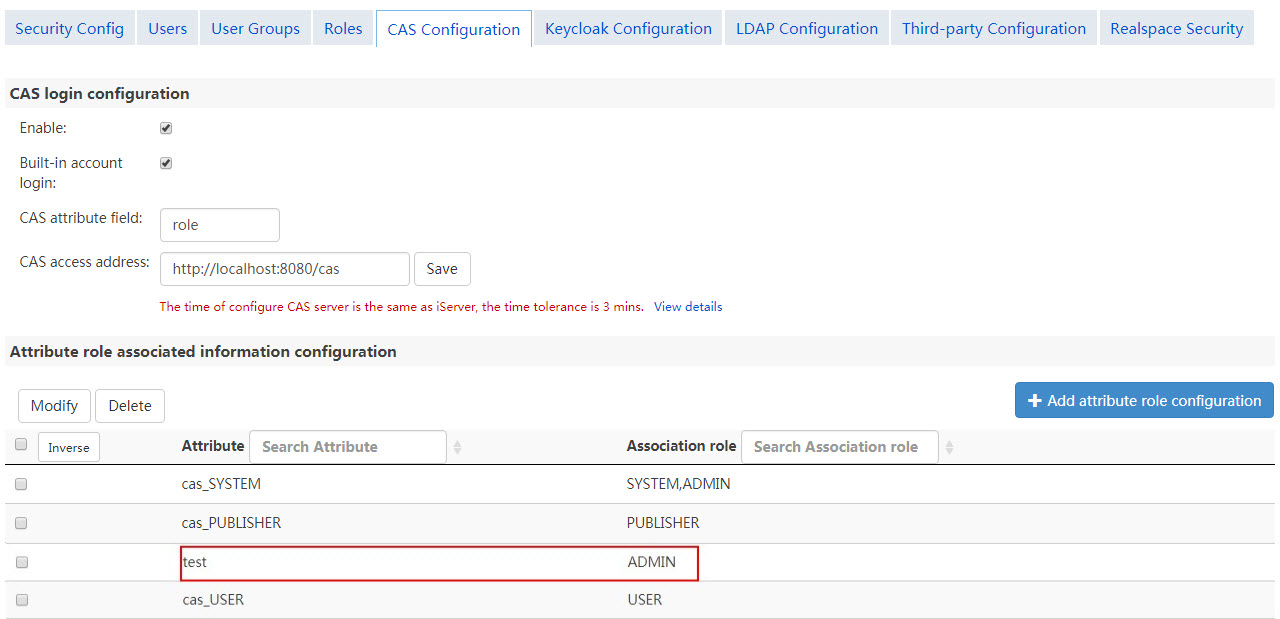
Log in iPortal with your administrator account, click Management>Security>Login Configuration>CAS Configuration. On the CAS Configuration page, select "Enable", then set the user attribute field in CAS and the address of the CAS service, then click "Save". Descriptions of the configuration items:
The CAS Configuration page lists the default mapping relationships between CAS user type and built-in roles. For normally using iPortal, click "Add attribute role configuration" in the "Attribute role associated information configuration" area, the required "Attribute" marked with red "*" on the dialog should be inputted the custom value you set when "Add account type field", then specify roles provided in iPortal. The CAS users associated with ADMIN, PORTAL_USER or PORTAL_VIEWER roles can log in to iPortal successfully. Otherwise, the unregistered status will be displayed on the iPortal home page.

After finishing the above configurations, the logged CAS users can only browse maps, services, etc., while cannot perform operations like creating maps, registering services. To make these operations available to user, additional configurations are required. Open shiro.ini file which locates in [SuperMap iPortal installation directory]\webapps\iportal\WEB-INF folder with a text editor, add casRealm.backRealm parameter for casRealm variable as shown in the following bold codes. After finishing the edit, restart iPortal service.
...
casRealm = com.supermap.iportal.security.IportalCasRealm
casRealm.attributeRuleMapping = iserver_att={cas_SYSTEM=[SYSTEM,ADMIN],cas_PUBLISHER=[PUBLISHER],cas_USER=[USER]}
...
usernamepasswordrealm = com.supermap.services.security.BuiltInTokenSupportedRealm
casRealm.backRealm = $usernamepasswordrealm
...
Note:
If you need to set the CAS server login and logout address different from the CAS server authentication address (for example, the CAS server is running in a dual network card or multiple network card environment, the CAS server login and logout addresses are different from the CAS server authentication address, i.e., IP), based on the above configuration, add the casRealm.casLoginLogoutPrefix parameter in the shiro.ini file (located under [SuperMap iPortal installation directory]\webapps\iserver\WEB-INF) to configure the CAS Server login and logout address shown as following in the bold code:
casRealm.enabled = false
casRealm.reserveSystemAccount = true
casRealm.casServerUrlPrefix = http://{ip}:{port}/cas
casRealm.casLoginLogoutPrefix=http://{ip}:{port}/cas
...
After configuring the user application system according to the above steps, the user can login to the iPortal, make maps and do other operations. However, the user application system and the iPortal did not achieve SSO. Only logging in to iPortal is implemented. In order to realize the SSO between user application system and iPortal, you need to modify the web.xml of your application system to enable CAS login authentication when logging in to user application system. However, this modification can only implement login validation. If user application system requires more detailed permission validation, e.g., some URLs, that can only be accessed by some users and for this, CAS extension development is required.
The Personal Center -> My information will block the function of modifying personal information when user login to iPortal via CAS. If the user needs to modify account information, e.g., modifying the nickname, you need to open the blocked "My Information" page or make extension development to the page to modify the user's nickname, and then by calling iPortal's modified nickname resource. Note that you needs to synchronize the nickname in the user account information of the CAS connection with the user nicknames recorded in the iPortal user table to make them consistent.