Oblique photogrammetric model singularization and attribute query operation manual
Overview
The oblique photogrammtric model is often referred to as a "one skin" model. In order to exert the application value of the oblique photogrammetric model, the oblique photogrammetric model must be singulated. Hypergraph 3D takes the lead in singularizing the oblique photogrammetric model by means of the model superimposition vector region. This method is simple in operation, and stores various attribute information of the business in the attribute table of the vector region data to realize singulation. Ability to perform attribute query on oblique photogrammetric model.
At present, SuperMap iClient3D for WebGL provides a number of demonstration programs, and the "oblique photogrammetric attribute query" example demonstrates the effect of oblique photogrammetric model to achieve singular selection and attribute query.
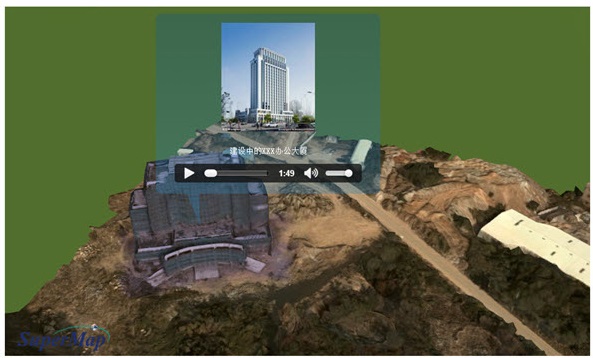
Figure: Oblique photogrammetric attribute query example effect
This document will guide users how to use their oblique photogrammetric model to implement attribute query on the WebGL client according to the effect of the example. The main flow of this operation is as follows:
Operating Procedures
1.Data Preparation
The necessary data includes:
- 1Oblique photogrammetric model data: such as the oblique photogrammetric model and configuration file (*.scp) in *.osgb format, if there is no configuration file, please refer to "Loading oblique photogrammetric model operation manual" The first step is to generate an SCP configuration file.
- 2Two-dimensional vector region data: The vector region data is matched with the oblique photogrammetric model position, and the attribute table of the vector region data is improved; the vector region data is stored in the file datasource (*.udb).
For the demonstration, the author made a modified vector region data whose properties are structured as shown below, where the "Name/Name" and "Des/Description" fields Is the business field of this example that will be used for attribute queries.
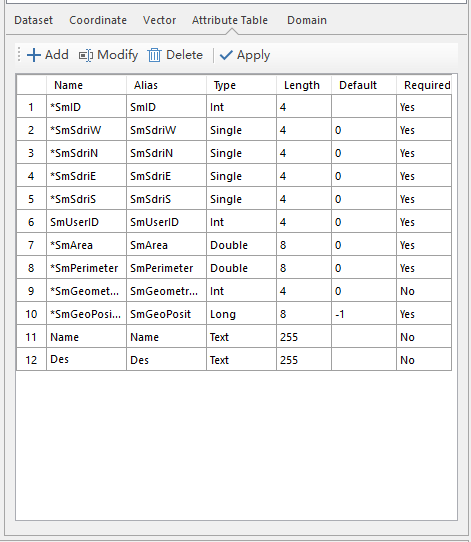
Figure: Attribute structure of the vector polygon attribute table
Select the dataset in the Workspace Manager and open its property sheet. Click Property Structure in the Edit tab of the ribbon's Property Sheet tab to view and modify it. The attribute structure of the data, and add attribute fields to the vector data according to business requirements, and improve the attribute values.
In order to be able to display images when the model is selected as in the example, optionally prepare the image resource (*.jpg) and store the image resource in the "%WebGLProducts%\examples\images" folder. under. The name of the image is the same as the value of the Name/Name field of the vector polygon property sheet.
2. Model Singularization
Instructions
Through the singularization of the model, it is equivalent to the vector plane data matching the position of the "bundled" position of the oblique photogrammetric model.
Steps:
(1). Open the file-type data source (*.udb) that holds the vector-side data in the Workspace Manager and Data Sources;
(2) Click the Model Singulation button on the "OSGB" tab of the SuperMap iDesktop desktop product, as shown below.

Figure: Click on the "Model Singulation" function
(3). The model singulation dialog box is displayed, as shown in the following figure.
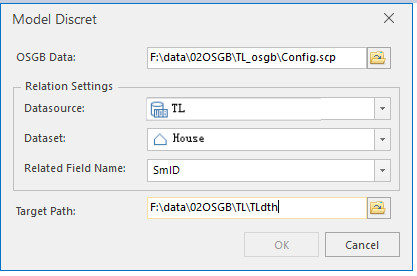
Figure: Model Singularization Dialog
Fill in the oblique photogrammetric model configuration file (*.scp) storage path in the oblique photogrammetric data dialog, click the icon button on the right to select the file path, or enter it directly in the text box.
(5). In the Association Settings of the dialog box, you can set the data source, dataset and associated fields where the vector data is located, as follows:
- Datasource: The datasource where the vector polygon data matches the oblique photogrammetric model. Select the datasource that the current workspace opens.
- Dataset: The dataset in which the vector polygon data matches the oblique photogrammetric model.
(6). Fill in the singulated target file storage path in the Target Path of the dialog box, click the icon button on the right to select the file path, or enter it directly in the text box.
(7). After setting the above parameters, click the "OK" button and wait for the processing to complete.
Result
After the operation is completed, a *.scp file and multiple folders with models are generated in the target path. The directory structure and the number and name of the files are the same as the original files. To verify the singulation effect, add the singularized model to the spherical scene in SuperMap iDesktop by adding the OSGB Cache Layer. Locate the layer and click on a house model in the scene. The model is highlighted, and it can be seen that the singulation process is successful.
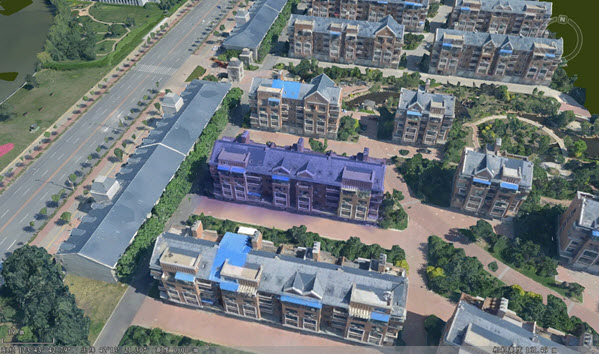
Figure: Click on the singular oblique photogrammetric model highlighting
3.Generate S3M data
Instructions
In order to improve the efficiency of WebGL client parsing and browsing, in this step, the OSG format tilt photography model is converted into S3M format 3D slice buffer, and the SuperMap iDesktop desktop product is used to provide the "Generate S3M Data" function button.
Steps
(1).Open SuperMap iDesktop and click Generate S3M Data in the "Scene Photography" tab "WebGL Client" group. >" button.

Figure: Click on the "Generate S3M Data" tool
(2). The "OSGB->S3M" dialog box pops up, as shown below.
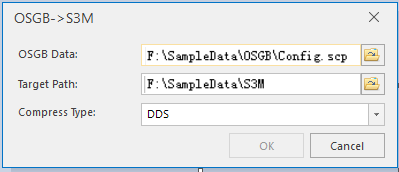
Figure: "OSGB->S3M" dialog
(3). Fill in the path of the scp configuration file in the Oblique Photogrammetric Data dialog box.
(4). Fill in the path of the converted target file in the Destination Path of the dialog box.
(5). There are three options for Common PC device, Android series device, IOS series device in the Compression type of the dialog box. Please use according to the usage. Terminal selection.
(6). After setting the above parameters, click the OK button and wait for the conversion to complete.
Result
The result of the "Generate S3M Data" operation is as shown on the right side of the figure. This step generates a target folder that is consistent with the original file structure. Open any model folder separately and you can see the OSGB format model and the S3M format model. Correspondence relationship, as shown below.
It is worth noting that after generating the 3D slice buffer in S3M format, the amount of model data is greatly reduced.
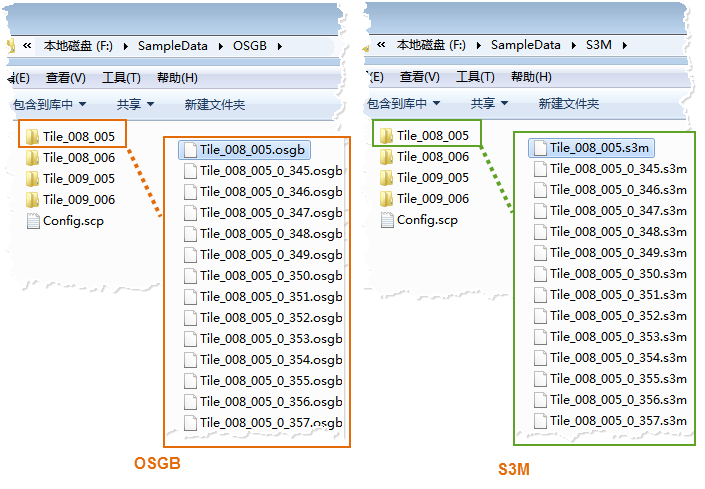
Figure: Generate S3M data results (right) and model correspondence
4. Publish 3D services and data services
Instructions
Instructions
In this step, the oblique photogrammetric model of the S3M format is distributed to a local or remote server in the form of a three-dimensional service to realize web network resource sharing, and a data service is also released for attribute query.
Steps
(1). In the “Workspace Manager” of SuperMap iDesktop desktop product, right click “Open File Datasource” in “Data Source” to open the datasource with Vector Region Data ( *.udb);
(2). Create a new spherical scene, select "Normal Layer" under "Layer Manager", right click "Add OSGB Cache" Layer, select the *.scp configuration file generated by the "Generate S3M Data" operation.
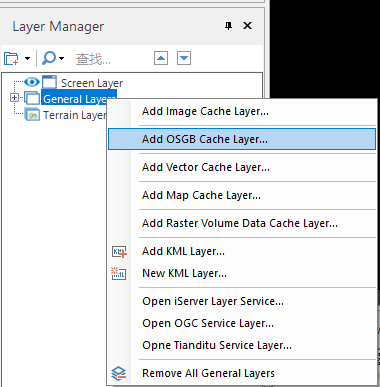
Figure: Add OSGB cache to the scene
(3). After loading the data, locate the layer and set the appropriate viewing angle to save the scene and workspace. After saving, you must close the current workspace, which may cause subsequent service publishing to fail.
(4). Start the SuperMap iServer service: In the %SuperMap iServer_HOME%/bin directory, click the "startup.bat" batch file to start the service.
(5). Open your browser and enter http://localhost:8090/iserver/manager in the address bar to enter "< Strong>Service Management page, click Quickly publish one or a group of services button under Homepage.
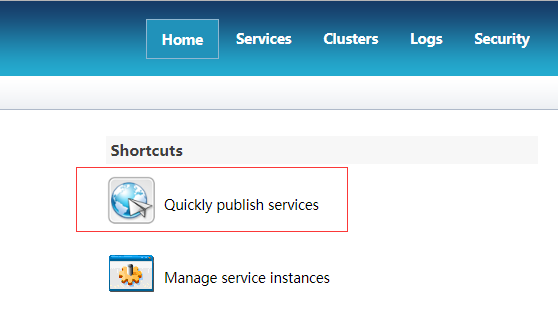
Figure: Quickly publish a service or a group of services
(6). Pop up the "Quick Publishing Service-Select Published Datasources" dialog and select "Datasource" "Workspace", click "Next".
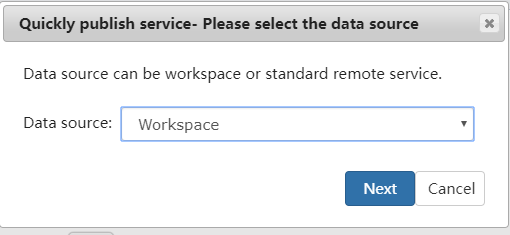
Figure: Datasource Selection Workspace
(7). Pop up the Quick Publishing Service-Configure Data dialog box and click Remote Browsing > "The button selects the saved workspace as described above and clicks "Next".
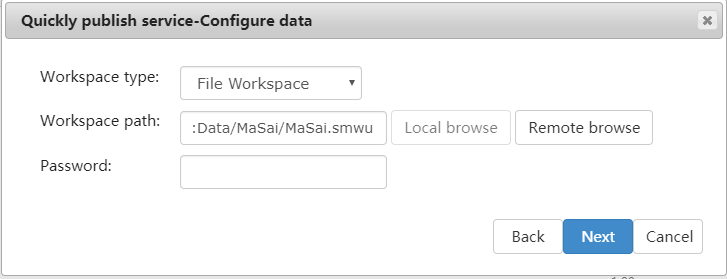
Figure: Select workspace configuration data
(8). Pop up the "Quick Publishing Service - Select Published Service Type" dialog box, check "REST-Data Service" and "REST" - 3D service ", click "Next".
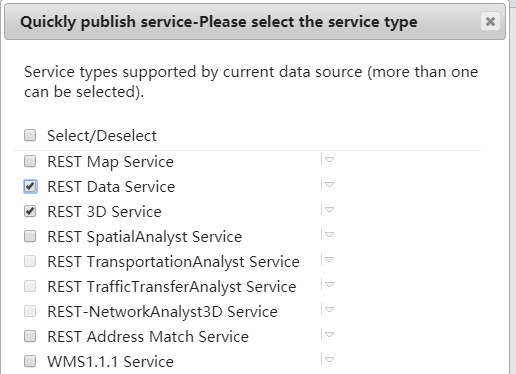
Figure: Checking 3D services and data services
At this point, the service release has been configured, click the "Finish" and "Close" buttons as prompted.
Result
After the service is released, the 3D service will be displayed in the service list, as shown in the following figure.
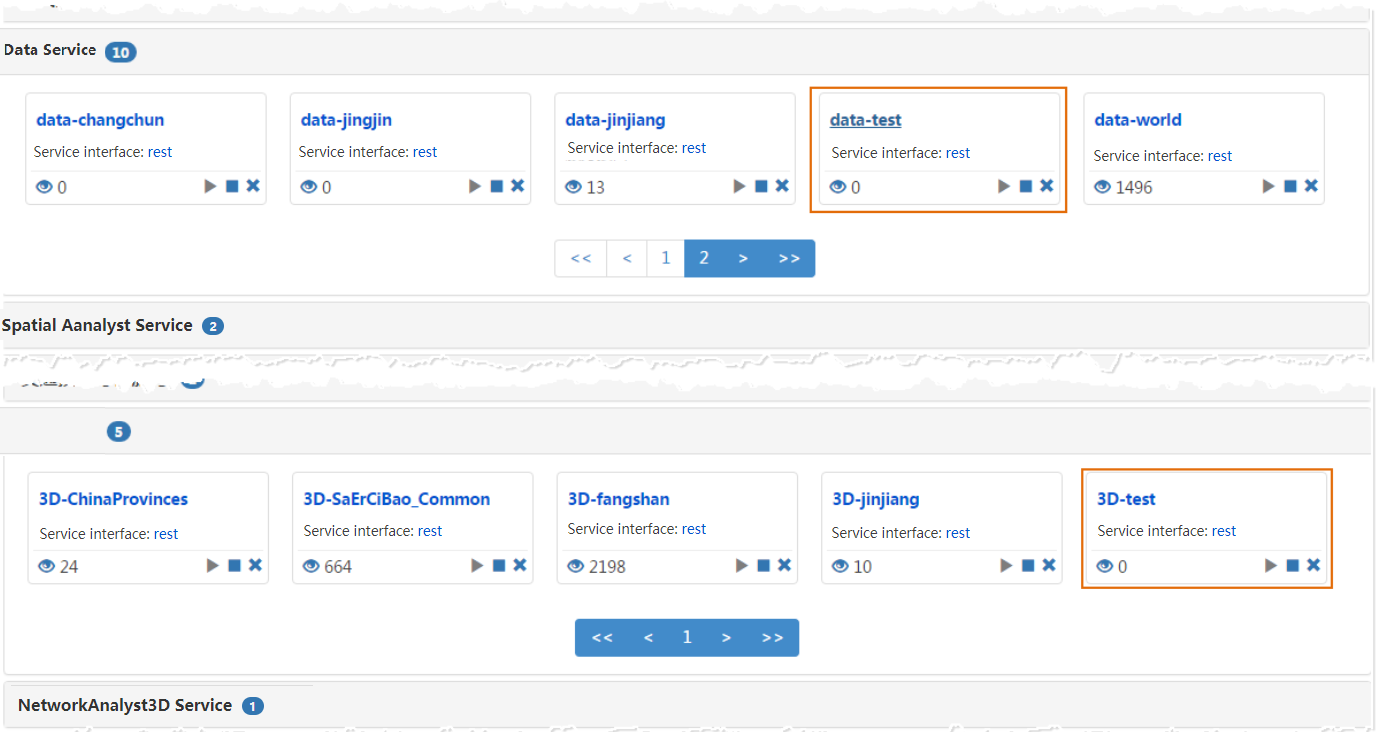
Figure: The newly published service is displayed in the service list
5. Client browsing and attribute query
Instructions
After the 3D service is released, the terrain data can be viewed through the WebGL client in this step.
Tip: Store the WebGL product package in the %SuperMap iServer_HOME%/webapps directory before proceeding.
操作步骤
(1) Obtain the 3D service url address and click to get it in the following order:
- Go to the service list page (http://localhost:8090/iserver/services< /a>), find and click on the 3D service published in the previous step;
- Click "Service Address" on the "Basic Information" page of the "Service Management" page
- Go to the "Roots" page and click on "realspace";
- Go to the 3D Service Root Node(3D) page and click on datas;
- Go to the 3D Data List(datas) page and click on Config;
- Go to the "3D Data Resources(data)" page and click "Get 3D Data Profile", as shown below Page, copy the urladdress of the browser's address bar.

Figure: Copy url address
(2) Enter the WebGL product package storage path (%SuperMap iServer_HOME%/webapps), under the "examples" folder, open the text S3MTiles.html "Example, modify the content of the following figure.
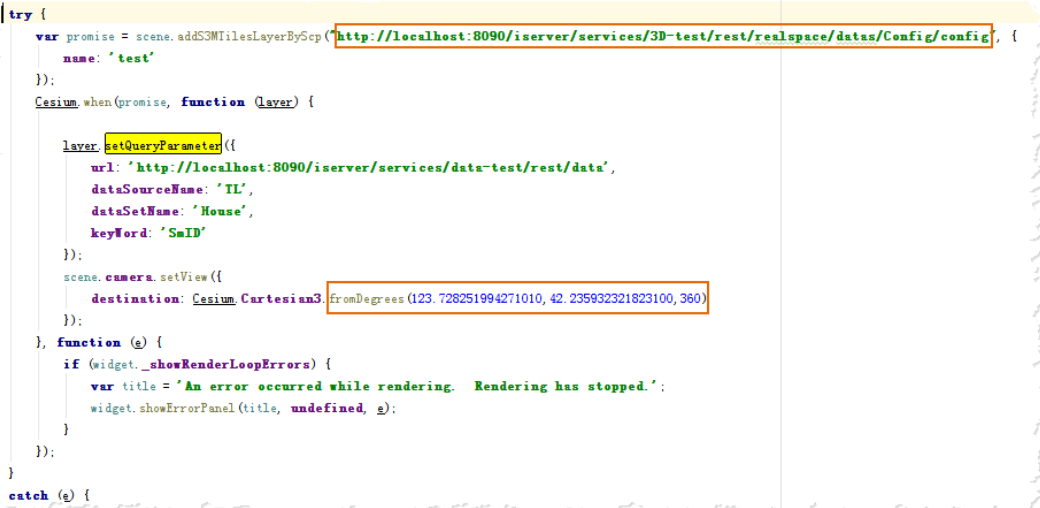
Figure: Modify the sample parameters
- Modify scene. addS3MTilesLayerByScp () function: Modify the address to a urladdress that was copied. Change the name.
- Modify the Cesium.Cartesian3.fromDegrees() function: its parameters are the center point positions of the tilted photographic model, longitude, latitude, and elevation. Change toscppoint coordinates in the file for flight positioning to the tilted photographic model position.
(3) Obtain the data service url address and click to get it in the following order:
- Go to the service list page (http://localhost:8090/iserver/services< /a>), find and click on the data service published in the previous step;
- Click "Service Address" on the "Basic Information" page of the "Service Management" page
- Go to the "Roots" page and click on "data";
- Go to the data service's root node page and copy the url address of the current page, as shown below:
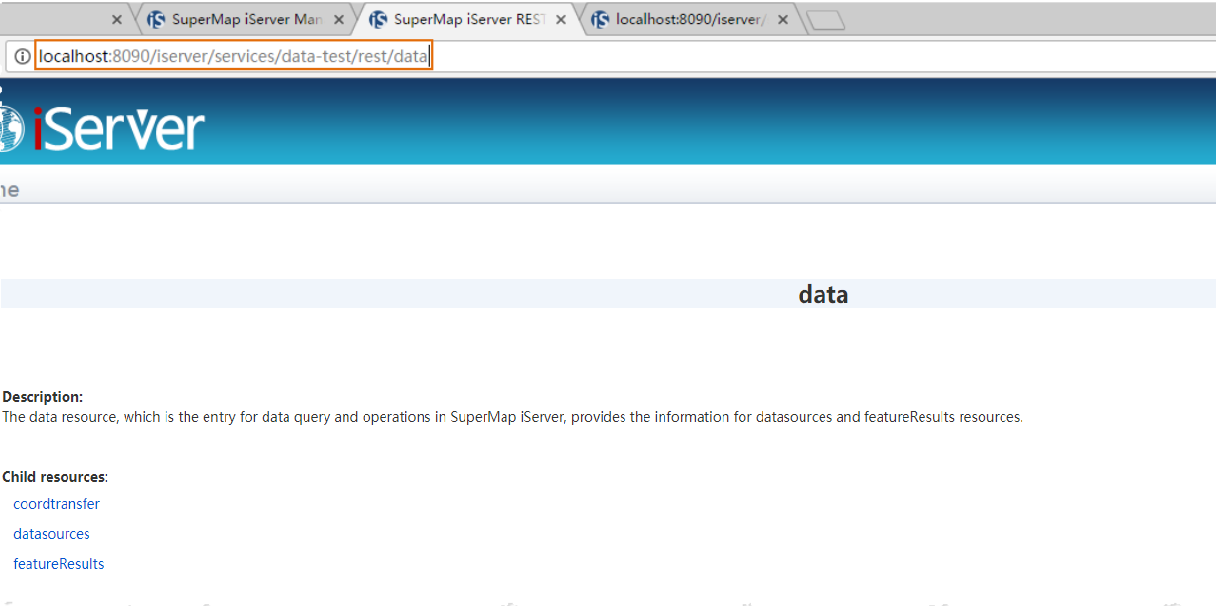
Figure: Copy the url address of the "root node of the data service" page
(4) In the "S3MTiles.html" example, set the property query parameters, that is, modify the layer.setQueryParameter() section, as shown below:
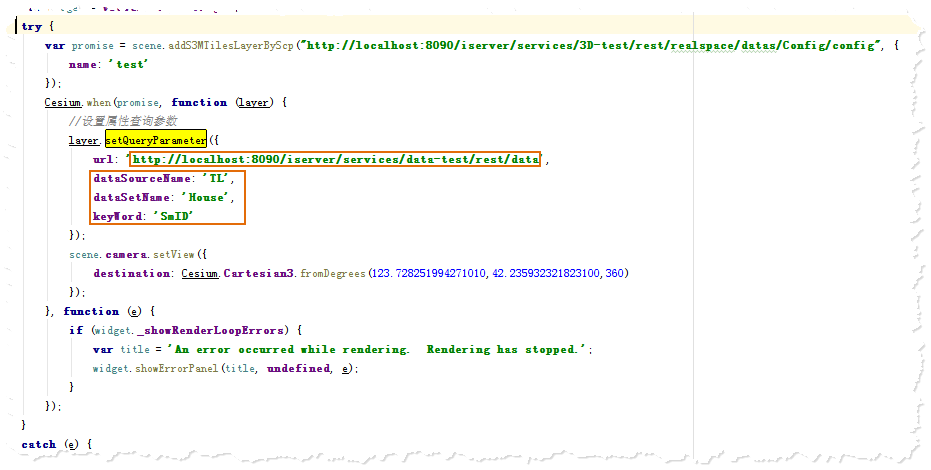
Figure: Modify the sample attribute query parameters
- Where url is the address of the data service, and the url address of the "data node" of the data service is pasted;
- dataSourceName is the name of the datasource;
- dataSetName is the name of the vector polygon dataset;
- keyWord is a query keyword and can be set to the "SmID" field.
(5) After the example is modified, open the S3MTiles.html page in localhost mode. The browser input address is: http://localhost:8090/%WebGL package%/examples/S3MTiles. Html
Result
After opening the webpage, the camera flies to the position where the oblique photography model is located, clicks on any model, the model is highlighted and the pop-up window displays the properties. The effect is as follows:
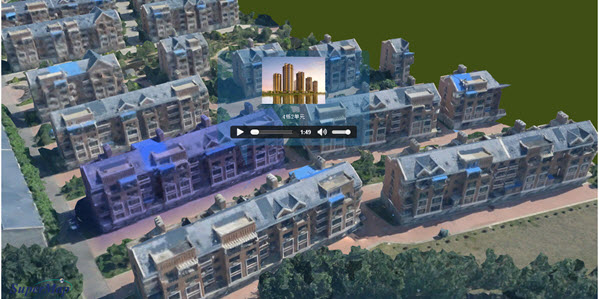
Figure: Attribute query rendering on a oblique photogrammetric model
Summary
Throughout the operational process, the following key points are for reference and understanding:
- In the first step of data preparation, the content of the attribute table of the vector region data is improved according to the business requirement, as the database of the attribute query;
- "Model Singulation" processing before the "Generate S3M Data" operation;
- When the workspace is created before the service is published, the workspace must include a datasource of the vector face for publishing the data service of the attribute query;
- Select "REST-3D Service" and "REST-Data Service" when publishing the service, where 3D service is used for model browsing and data service is used for attribute query;
- The example "S3MTiles.html" mainly modifies the following:
- scene.addS3MTilesLayerByScp() function: Add S3MTileslayer to the scene in SCP cache, copy here The configuration file address of the 3D service;
- Cesium.Cartesian3.fromDegrees() function: Modify the longitude, latitude and elevation parameters respectively for flight positioning to the position of the oblique photogrammetric model;
- layer.setQueryParameter() function: Set property query parameters, including data service address, data source name, Data set name, query key field.